

Kotak
Stockshaala
Chapter 9 | 3 min read
Bollinger Bands Strategy
Bollinger Bands reveal three distinct trading setups, each valid in a specific market condition. Using the wrong setup for the wrong condition is the primary reason Bollinger Bands-based trades fail.
This chapter defines all three setups with specific entry rules, stop placement, and exit logic, and clarifies which market condition calls for which approach.
By the end of this chapter, you will be able to:
- Apply the Bollinger Bands breakout, pullback, and reversal setups with specific entry and exit rules.
- Identify which market condition each setup is appropriate for.
- Avoid applying the wrong setup type to the wrong market state.
Three Setups
Setup 1 - Breakout After Squeeze
- Condition: Bollinger Squeeze confirmed (bands at narrowest point in several months).
- Entry: price closes outside the upper band after the squeeze, with above-average volume.
- Stop loss: below the squeeze range low for longs.
- Exit: when price closes back inside the bands or histogram contraction signals momentum fading.
Setup 2 - Pullback to Middle Band
- Condition: price is walking the upper band, confirming a strong uptrend.
- Entry: price pulls back to the middle band, forms a rejection candle, and the next candle breaks the rejection candle's high.
- Stop: below the rejection candle's low or the most recent swing low.
- Exit: the prior swing high as the first target, or when price closes back below the middle band.
Setup 3 - Double Touch Reversal
- Condition: price touches the lower band twice on declining volume showing bullish divergence.
- Entry: close above the prior candle's high after the second touch.
- Stop: below the second touch low.
- Exit: middle band as the first target.
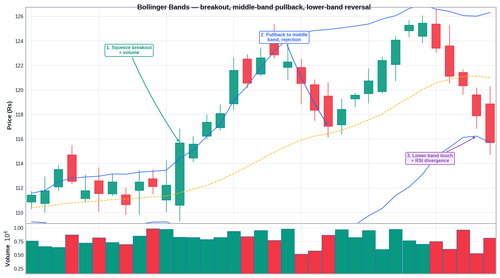
Summary of all three setups with entry, stop, and target logic:
Setup | Best Condition | Entry Trigger | Stop | First Target |
|---|---|---|---|---|
Breakout after Squeeze | Low volatility transitioning to expansion | Close outside band with volume | Below squeeze range low | 1.5x to 2x the band width above breakout |
Pullback to Middle Band | Strong trend with price walking upper band | Rejection candle at middle band | Below rejection candle low | Return to upper band |
Double Touch Reversal | Range-bound or oversold condition | Close above prior candle high at lower band | Below second touch low | Middle band |
Common Mistakes
Mistake 1: Applying the reversal setup in a trending market
The Double Touch Reversal is designed for range-bound conditions. In a strong downtrend, a double touch of the lower band is normal trend behaviour, not a reversal signal.
Mistake 2: Using the middle band as a target in a strong trend
In a strong trending market, the middle band is a support zone, not a target. Using it as a target exits a winning position prematurely.
Key Takeaways
- Bollinger Bands produce three distinct setups: breakout after squeeze, pullback to middle band, and double touch reversal. Each requires different entry, stop, and target logic.
- The most common error is applying the wrong setup to the wrong condition. Identify the market state first, then select the appropriate setup.
- Use breakouts in compressed-to-expanding conditions. Use pullbacks when price is walking the upper band. Use reversals only in range-bound conditions near major levels.
Assignment
Open the Nifty 50 daily chart with Bollinger Bands (20,2). Identify which of the three setups is currently most relevant: are the bands squeezed (breakout setup), is price walking the upper band (pullback setup), or has price touched the lower band twice on declining volume (reversal setup)?
Write a one-paragraph trade thesis for whichever setup applies, including entry trigger, stop level, and target.
Course Conclusion
Congratulations — you have completed all 35 chapters of the Swing Trading Strategies course. You now have a complete toolkit: market structure analysis, timeframe alignment, entry techniques, risk management, indicator systems, fundamental filters, trading psychology, and nine tested strategies.
The next step is practice. Paper trade each strategy on the Nifty 50 for one month before committing capital.
Use the trade journal from Chapter 26 to track every setup. The edge is in the process.
Disclaimer: This article is for informational purposes only and does not constitute financial advice. It is not produced by the desk of the Kotak Neo Research Team, nor is it a report published by the Kotak Neo Research Team. The information presented is compiled from several secondary sources available on the internet and may change over time. Investors should conduct their own research and consult with financial professionals before making any investment decisions. Read the full disclaimer here.
Investments in securities market are subject to market risks, read all the related documents carefully before investing. Brokerage will not exceed SEBI prescribed limit. The securities are quoted as an example and not as a recommendation. SEBI Registration No-INZ000200137 Member Id NSE-08081; BSE-673; MSE-1024, MCX-56285, NCDEX-1262.
Recommended Courses for you















Learn, Invest, and Grow with Kotak Videos
Explore our comprehensive video library that blends expert market insights with Kotak's innovative financial solutions to support your goals.

Trading with collateral as margin with Kotak Neo

How India is Redefining Space Exploration