
Share Transfer to NSDL: Online via CDSL Easiest
- 4 min read
- 1,070
- Published 20 Feb 2026

If your current broker is on CDSL and Kotak Neo is on NSDL, it’s called an inter-depository transfer. You can do this offline or via CDSL Easiest (online), but offline is simpler for most users.
⚠️ Note: This method requires a Digital Signature Certificate (DSC), which costs ₹2,500+ and involves more technical setup. Only recommended if you plan frequent transfers.
When to Use Easiest:
✓ You plan to make multiple transfers in the future
✓ You already have a DSC
✓ You want maximum online convenience
✗ Not recommended for one-time transfers
Step 1: Register for CDSL Easiest (Trusted Account)
Visit CDSL Easiest Portal:
- Go to: https://web.cdslindia.com/myeasitoken/Home/Login
- Click: “Register” (New User)
- Enter: Your 16-digit CDSL BO ID
- Complete: Email and mobile verification
- Enter the OTP you received on your registered mobile number or email and click on Continue
- Account details: In the account details section, enter the preferred username, answer the security question, select the Trusted Account checkbox and click on Continue.
What happens next:
- Your broker receives the registration request
- Broker approves within 24 to 48 hours
- You receive email with login credentials
Step 2: Obtain a Digital Signature Certificate (DSC)
Where to buy:
- eMudhra Digital Platform: www.emudhradigital.com
- Sify Digital: www.sifydigital.com
- NCode Solutions: www.ncode.co.in
What to order:
- Type: Class 3 Individual
- Purpose: Signature
- Validity: 1-year (cheapest option)
- Cost: ₹2,500–3,500 + GST
Process:
- Visit the provider’s website
- Select “Class 3 Individual → Signature”
- Complete identity verification (Aadhaar eKYC)
- Pay online
- Receive USB token (e-token) at your address in 3-5 days
- Install the token drivers on your computer
- Your DSC is ready to use
Step 3: Verify the E-token
- Fill the DSC Mapping Form
- Print screenshots of your e-token certificate. To find your e-token certificate on Internet Explorer:
- Open Internet Explorer.
- Click on Tools and then Internet Options.
- Click on Content and then Certificates.
- Take screenshots of these tabs:
o General tab
o Details tab: Serial number
o Details tab: Subject alternative name
o Details tab: Subject - For Windows users: Search for Internet options in the search bar > Content > click on Certificates, double-click on your e-token details, and share screenshots of all three tabs (General, Details, Certificate path).
-
Courier the DSA mapping form and print out of e-token certificate screenshot to your current broker
-
For e-mudhra token users: To verify the e-token online:
- Install the Embridge application on Windows OS by visiting embridge.emudhra.com
- Login to web.cdslindia.com/myeasitoken/home/login
- Click on Register E-token.
- Enter the token details and password.
- Click on Verify.
Step 4: Link Your Digital Signature Token
After receiving the confirmation email from your current broker on receipt of documents, change your mode of operation from Trusted to Account of Choice
- Log in to CDSL Easiest with your credentials
- Go to: Miscellaneous → Modify Mode of Operation
- CDSL will link your e-token within 20 working days. Once CDSL maps your e-token, you can transfer shares online.
Step 5: Add Kotak as a Trusted Beneficiary
In Easiest Portal:
- Go to: Transaction → BO Linking → BO Linking Setup

-
Click: “Add New”
-
Enter Kotak’s Target BO ID (16-digit): - IN300214 + your 8-digit Kotak ID - Example: IN30021412345678
-
Click: Submit
Verification:
- CDSL sends an authentication email
- Click the link in the email
- Verify your PAN and demat details
- Generate and enter OTP
- Kotak’s account is now linked
Make it Trusted:
- Go to: Miscellaneous → Edit Trusted Account
- Select: Your Kotak BO ID
- Click: Mark as Trusted
- Broker verifies within 24 hours
- Status changes to: “Authenticated by DP”

Step 6: Initiate Transfer on Easiest
In Easiest Portal:
- Go to: Transaction → Setup → Bulk Setup
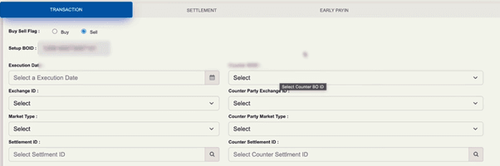
-
Click: “Create New”
-
Fill in: - Execution Date: Today or future date
- Counter BO ID: Your Kotak BO ID (from dropdown)
- Entity ID: NA (leave blank)
- Add ISINs: Click “+” and select securities
- Quantity: Shares to transfer
- Reason for Transfer: Select appropriate reason from dropdown - Consideration: 0 (no money involved)
- Click: Submit
Step 7: Digitally Sign the Instruction
The system will ask you to:
- Insert your DSC USB token into computer
- Enter your token PIN
- The system will digitally sign your instruction
- You may also receive an OTP for additional confirmation
- Click: Verify → Commit
Once committed: - Instruction is lodged in CDSL’s system - Status shows as “Pending” - CDSL begins processing
Step 8: Track and Monitor
In Easiest:
- Go to: Transactions → Inquiry → Status
- View your transfer instruction status
- CDSL will process and execute
- You’ll receive email confirmation when complete
✓Transfer Complete! The shares have moved from your old account to Kotak
0 people liked this article.


